Building on our previous announcement, AWS Outposts third-party storage integration for data volumes, AWS is expanding its collaboration with third-party storage solutions by introducing support for boot volumes backed by external storage arrays. In this post we show you how to boot Amazon Elastic Compute Cloud (Amazon EC2) instances on Outposts directly from NetApp on-premise enterprise array and Pure Storage FlashArray, providing greater flexibility to align your workload needs for storage.
With this enhancement, you can now:
- Launch EC2 instances using boot volumes backed by compatible third-party storage arrays
- Use existing storage management workflows and tools for both boot and data volumes
- Take advantage of advanced features like storage efficiencies and cloning for cost reduction
- Migrate compute of existing workloads that rely on external boot volumes to Outposts
- Employ High Availability (HA) and Disaster Recover (DR) architectures with technologies such as NetApp’s SnapMirror or Pure Storage’s ActiveDR, enabling quick and easy recovery from failures and streamline DR processes.
The boot volume integration is enabled through AWS-provided launch Amazon Machine Images (AMIs) and sample automation scripts. Two methods are supported:
- Storage Area Network boot (SANboot), which uses Pre-boot eXecution Environment (iPXE) and Internet Small Computer System Interface (iSCSI) to attach an external volume when booting.
- Outposts localboot, which hydrates a local Non-Volatile Memory Express (NVMe) volume using iSCSI or NVMe-over-TCP, prior to booting.
The added third-party boot volume support further strengthens the commitment of AWS to providing flexible, enterprise-grade storage options for you while maintaining the automation tenants of the AWS experience.
SANboot solution overview
SANboot is a method of booting an EC2 instance from a block volume stored on a remote storage device. iPXE is an open source boot firmware that allows computers to boot from a network location, and when combined with iSCSI, it enables the start up of an operating system (OS) from a remote iSCSI target. In this case, the iSCSI target is a third-party storage system. The EC2 instance boots from the remote block volume as if it were a local disk. Read/write operations within the OS are written directly to the external storage array.
The instance can be shutdown and the data remains persistent on the third-party storage device. iPXE is stateless by design, thus subsequent boots must go through the full SANboot process. Snapshots of the volumes can be performed by the external storage device.
SANboot prerequisites
The following prerequisites are necessary for SANboot:
- An Outposts rack or Outposts 2U server. Outposts 1U server is not supported.
- An external storage system with IP reachability to the Outposts local network through a local gateway (LGW) or local network interface (LNI).
- An Amazon EC2 bootable image stored as a block volume on the external storage system.
- The block volume should be configured with an iSCSI IQN
- At the time of this post, only Windows 2022 (or newer) and Red Hat Linux 9 are supported operating systems
- (optional) Authentication credentials stored in AWS Secrets Manager if authentication is needed.
- If Secrets Manager is used, your EC2 instance profile needs the following minimum required permissions:
- (optional) Use Outposts SANboot script from AWS Samples downloaded onto your management computer. Your computer must be capable of running Python scripts and connected to both the external storage system and the AWS Region.
SANboot deployment overview
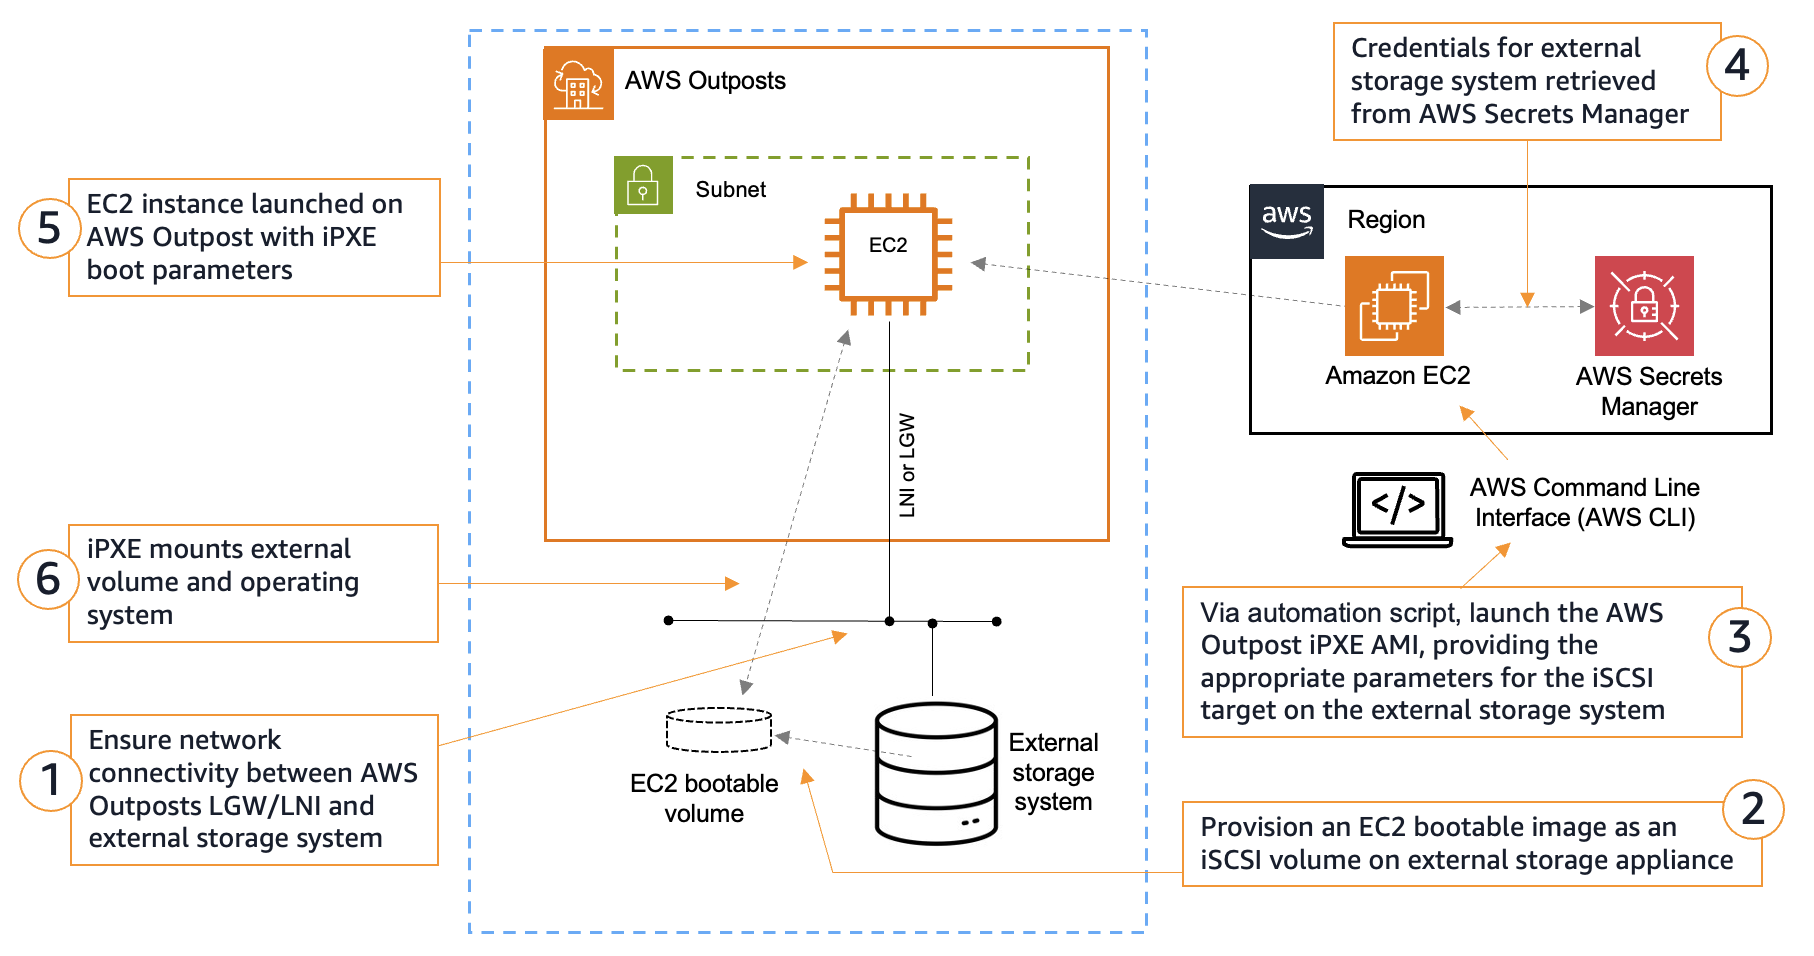
The following diagram shows the workflow when launching an EC2 instance using SANboot.

Figure 1 – SANboot workflow
- The Outposts must have network connectivity to the external storage system through the Outposts local network connection. Specifically, the EC2 instances must communicate to the storage system. This should be a high speed connection with low latency (recommended 10Gbps or more, and under 10ms round trip). The Outposts and storage system do not have to be on the same subnet, instead they just need IP reachability.
- For Outposts racks, the EC2 instance connects through the LGW.
- For Outposts 2U servers, the EC2 instance connects through the LNI.
- The boot volume must be an Amazon EC2 bootable image. This includes the appropriate settings and drivers for the respective OS.
- Run the SANboot automation script and follow the prompts to enter the relevant parameters for your boot volume. This information is used to populate the Multipurpose Internet Mail Extension (MIME) multipart user data that iPXE uses for its initial configuration. See the following section on SANboot script walkthrough for more information.
- (optional) If iSCSI authentication is enabled, the SANboot automation script retrieves the credentials of the iSCSI target stored in Secrets Manager to be later populated to the iPXE script.
- The iPXE boot AMI launches its firmware image and executes the iPXE script. This script contains the necessary information to mount the remote iSCSI block volume. This includes the iSCSI intiator settings, the IP address of the iSCSI target, the credentials, the iSCSI port, and the iSCSI IQN. The iPXE boot AMI is a relatively small image that is pulled down from the Region. The time it takes to launch the iPXE image depends on the bandwidth of the Outposts service link connection to the Region.
- The iPXE firmware establishes the iSCSI connection to the target and boots the OS from the remote storage device over the local network. If applicable, then more user data information can be passed to the booting OS. The time it takes for the OS to boot depends on the speed of the local area network.
SANboot sample script walkthrough
The following diagram shows the workflow for executing the SANboot sample script.
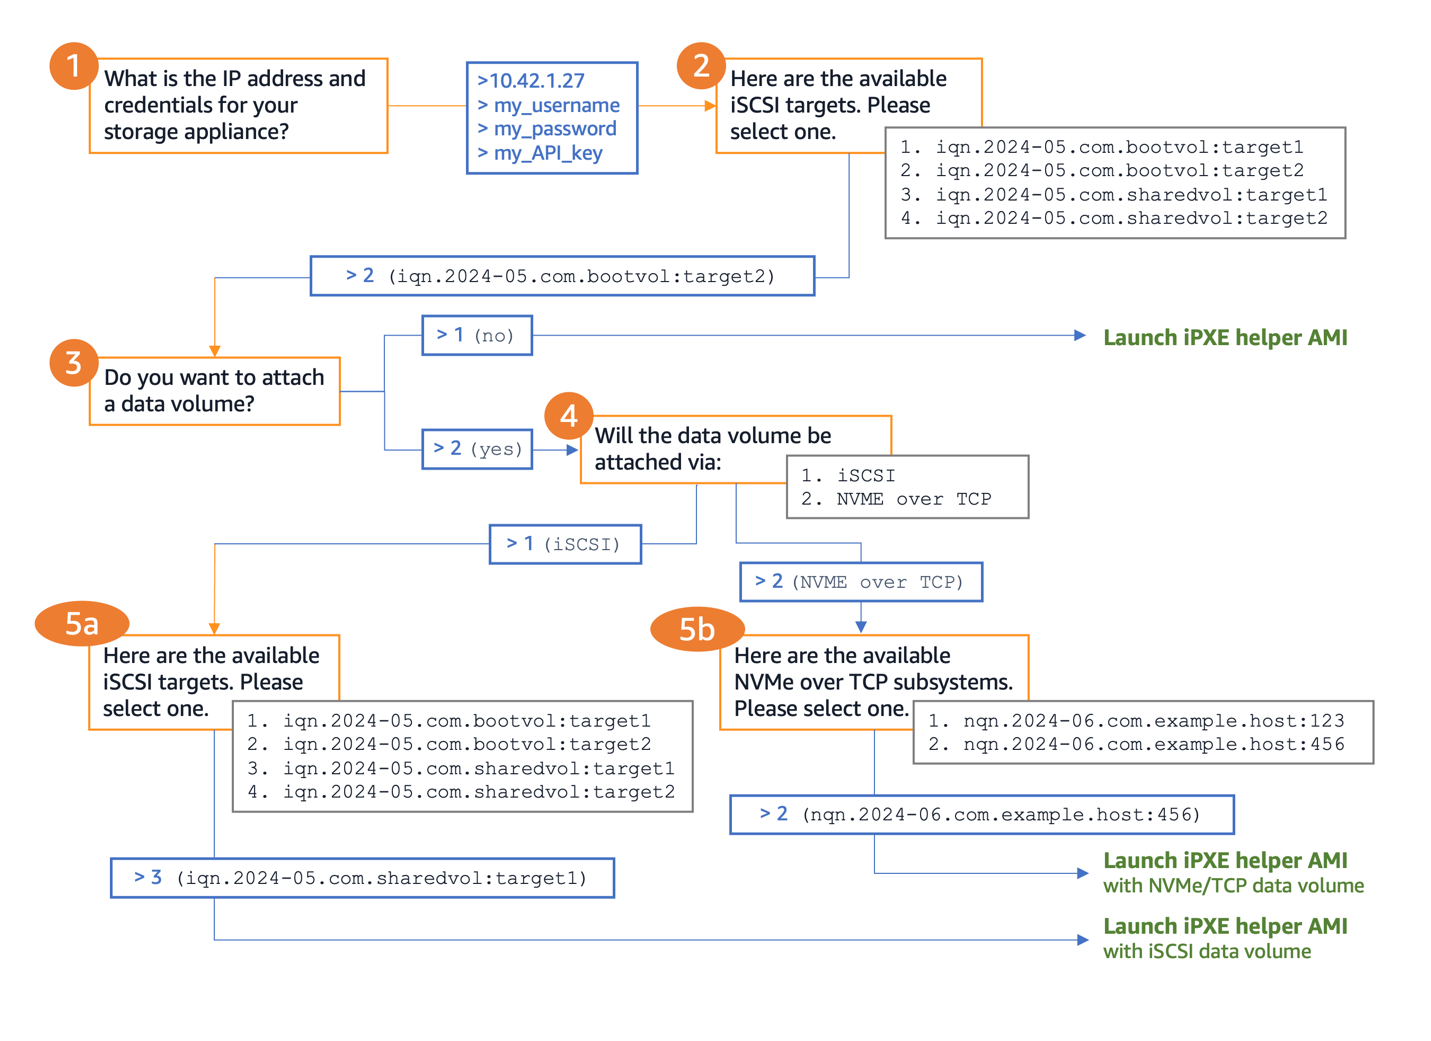
Figure 2 – SANboot automation script walkthrough
Outposts localboot solution overview
Outposts localboot, using iSCSI or NVMe-over-TCP, is a method of booting an EC2 instance using a copy of a boot volume retrieved from a remote storage device. The original source image is not modified and remains unchanged. First, a localboot AMI is launched as a helper instance to facilitate the copying of the boot volume. The localboot instance acts as the iSCSI initiator or NVMe-over-TCP host, and mounts the remote boot volume from the third-party storage system. Then, the block volume is copied to local instance storage on the EC2 instance. The EC2 instance reboots using the local instance storage volume.
Localboot uses instance store volumes, which are ephemeral in nature. The boot volume is deleted when the EC2 instance that it is attached to is terminated or stopped. This is suitable for temporary guest desktop access or read-only workloads. Data volumes from external storage can also be mounted during the localboot process, which can be used to store data persistently.
Localboot prerequisites
The following prerequisites are necessary for localboot:
- An Outposts rack or Outposts 2U server.
- An external storage system with IP reachability to the Outposts local network through an LGW or LNI.
- An Amazon EC2 bootable image stored as a block volume on the external storage system.
- The block volume should be configured with an iSCSI IQN or NVMe-over-TCP NQN.
- At the time of this post, Red Hat Linux 9 is the only supported operating system.
- If using Outposts rack, instance types must have local NVMe drives to support instance store volumes. These include the C/M/R “d” type instances such as c5d, m5d, or r7d.
- Boot volumes on third-party storage systems must fit within the instance store of the instance type chosen. For example, an m5d.xlarge has one 150GB NVMe SSD for the instance store. The boot volume must be under 150GB to fit within an m5d.xlarge instance store. If the boot volume is larger, then a larger instance type must be chosen, such as an m5d.2xlarge (which has a 300GB NVMe SSD).
- (optional) Authentication credentials are stored in Secrets Manager if authentication is needed.
- If Secrets Manager is used, your EC2 instance profile needs the following minimum required permissions:
- (optional) Outposts localboot script from AWS Samples downloaded onto your management computer. Your computer must be capable of running Python scripts and connected to both the external storage system and the Region.
Localboot deployment overview
The following diagram shows the workflow when launching an EC2 instance using localboot.
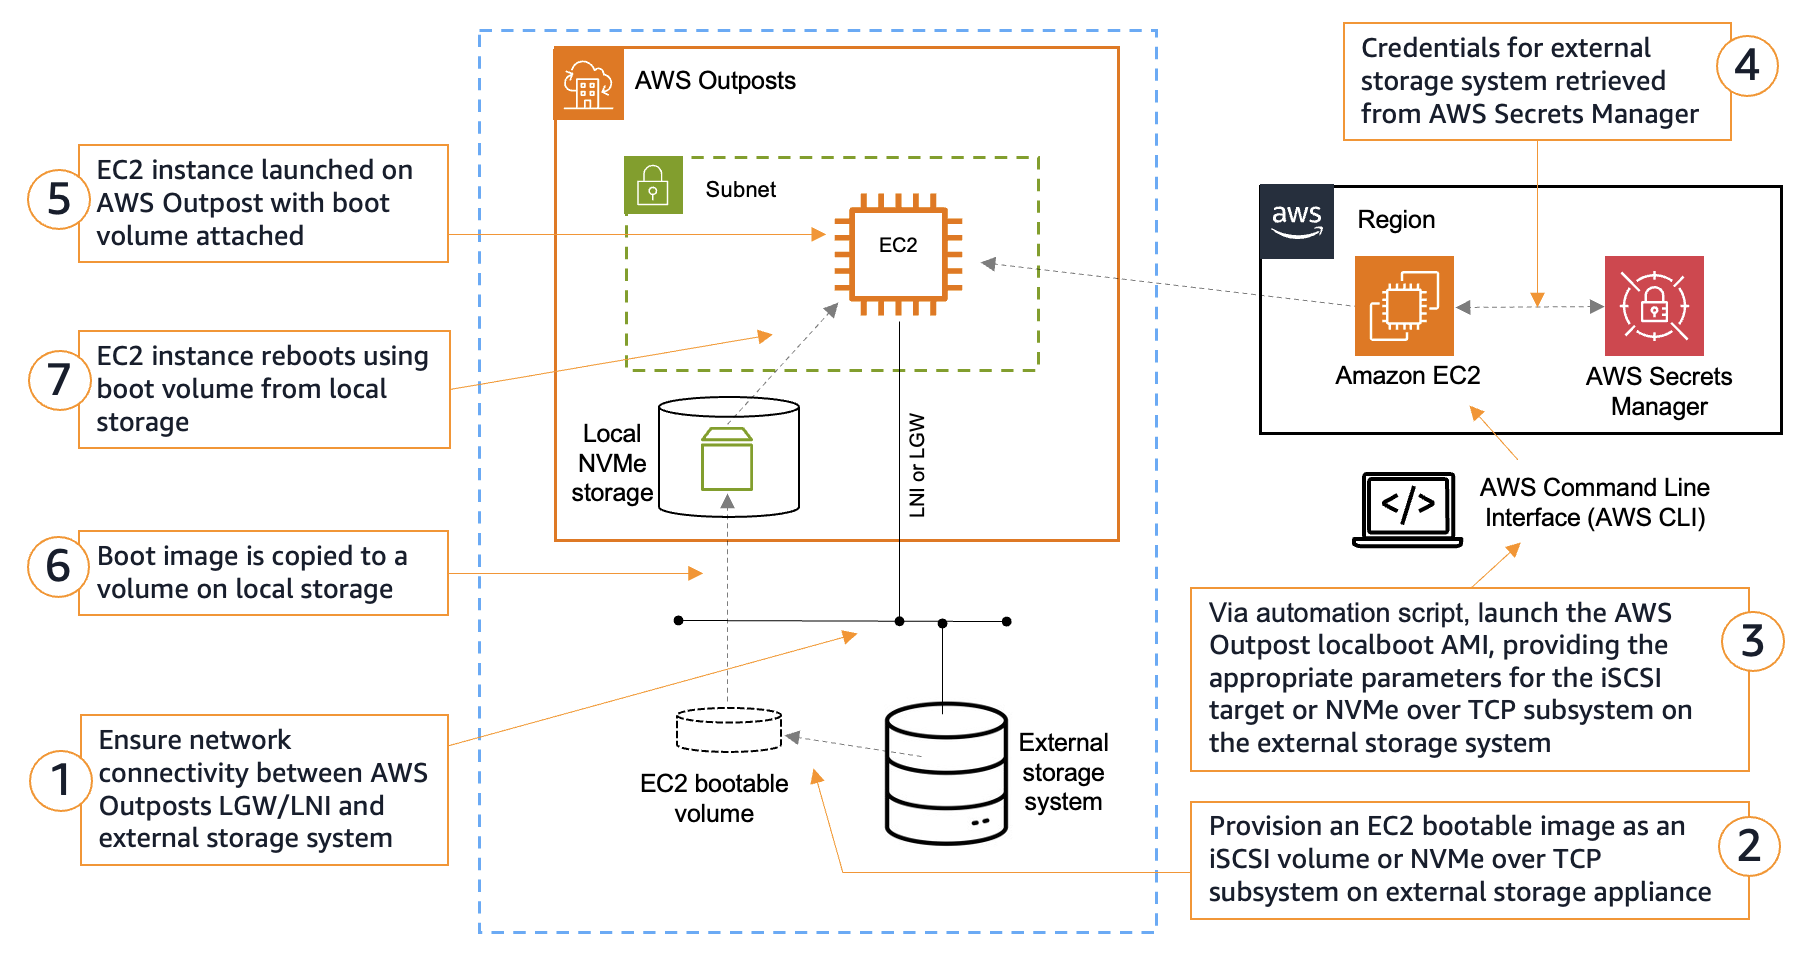
Figure 3 – Localboot workflow
Steps 1 and 2 are the same as SANboot deployment, see instructions above. Starting with step 3 for localboot:
- Run the localboot automation script and follow the prompts to enter the relevant parameters for your boot volume. This information is used to populate the MIME multipart user data that the localboot instance uses to mount the external boot volume. Go to the following localboot script walkthrough. The user data contains the necessary information to mount the remote iSCSI or NVMe-over-TCP block volume.
- (Optional) The localboot automation script retrieves the credentials of the external storage appliance stored in Secrets Manager.
- The localboot AMI is downloaded from the Region and launched. This can take a few minutes depending on the speed of the Outposts service link connection to the Region. When booting, the localboot AMI runs the user data script to attach the boot volume from the third-party storage system.
- The mounted boot volume is then copied to the local instance storage of the EC2 instance and configured as the boot partition. The time it takes to copy depends on the speed of your local network. When the copying is completed, the EC2 instance reboots using the newly configured boot partition.
- A copy of the boot volume is booted as a new EC2 instance. If applicable, then more user data information (such as mounting a data volume) can be passed to the booting OS.
Outposts localboot sample script walkthrough
The following diagram shows the workflow for running the localboot sample script.

Figure 4 – Localboot automation script walkthrough
Conclusion
The introduction of third-party boot volume support allows you to continue getting value from your existing investments in external shared storage by connecting these arrays with Amazon EC2 on Outposts. Both the SANboot and localboot methods allow you to integrate your existing storage solutions with AWS Outposts, enabling them to boot EC2 instances directly from NetApp on-premise enterprise storage arrays and Pure Storage FlashArray volumes. This capability not only enhances storage options for EC2 instances running on Outposts but also streamlines workload migration and offers advanced features such as storage efficiencies for boot volumes. Automated configuration scripts and AWS-provided helper AMIs allow you to maintain the seamless and automated experience expected from AWS, while also giving you the flexibility to use your preferred enterprise storage solutions. Combined with the previously announced support for data volumes, this development further demonstrates the commitment of AWS to offering flexible solutions that can integrate into your existing hybrid environments.
To speak to an Outposts expert and learn more, submit this form.
To learn more about how NetApp and Pure Storage solutions work with Outposts, read the NetApp on-premises storage arrays for AWS Outposts blog post and the Pure Storage FlashArray for AWS Outposts blog post.